
Photoshop Tools: A Beginner’s Guide to Magic Wand, Lasso, and Other Features
If you’re just getting started with Adobe Photoshop CC 2020, you’ve likely researched Photoshop tutorials to help you learn the program.
Receive free ecommerce & product photography tips
But before you jump into how-tos, it’s a good idea to start with the basics. What is the Magic Wand tool? Which Photoshop tools do you need to edit product photos? How do you customize the Photoshop toolbar to streamline your editing workflow?
Photoshop version CC 2020 offers a lot of improvements and new features from previous iterations, delivering more efficiencies and a wide array of options to choose from.
Let’s look at how to customize the Toolbar in Photoshop and the Adobe Photoshop CC 2021 tools — and how to use them with examples.
In this article
Where is the Photoshop CC 2021 Toolbar?
By default, the Photoshop CC 2021 Toolbar is the part of Photoshop that’s anchored to the left of the application window. However, you can move it around and change its size, depending on your needs.
How to customize the Toolbar in Photoshop
You can customize the Toolbar part of Photoshop a few different ways.
Moving the Toolbar: To customize the Photoshop Toolbar location, click on the series of vertical lines (located at the top of the Toolbar) and drag the toolbar to another part of the screen. This action un-anchors the Toolbar from its default location.
Using columns: If you prefer the Photoshop CC 2021 Toolbar to be two columns instead of one, click on the two triangles at the very top of the Toolbar. Clicking on the triangles again will toggle the Toolbar back to a single column.
Add/remove Photoshop tools: If there are Photoshop tools missing from the Toolbar, or if you want to customize the tools visible in the Toolbar, click on the three little dots located at the bottom of the Toolbar, just above the squares showing the foreground and background colors.
If Photoshop tools have been removed from the Toolbar, they’ll appear in a dropdown once you click on these dots.
If your Toolbar is at its default setting, the only option will be Edit Toolbar. Click on Edit Toolbar to open the Customize Toolbar window.
Within this window, you can customize which Photoshop tools appear on the Toolbar. Tools you rarely use can be moved into Extra Tools so they won’t appear in the Toolbar. Click on the tool you wish to move in the Toolbar column and drag it to the Extra Tools column. You can also drag tools from Extra Tools back into the Toolbar column.
Foreground and background colors in the Toolbar
Immediately below the three dots in the Toolbar, you’ll see two color squares (the colors you see in the squares will vary).
Note that one square rests on top of the other. If you click on the arrows to the top and right of the squares, the colors in each square switch places.
The color on top is the foreground color, and the color under it is the background color. You can change either of these colors by double-clicking on the color square and adjusting the color in the Color Picker window that pops up.
It’s important to understand what foreground and background colors are as you learn the rest of the tools in the Toolbar.
For instance, any time you paint with the Brush Tool, you will paint with the foreground color by default. Any time you remove part of a non-layered image (by using the Eraser Tool, or by moving or deleting part of a selection), the background color will show through into your image.
Adobe Photoshop CC 2021 tools
There are many Adobe Photoshop CC 2021 tools that you can use in post-processing, several of which are especially useful for editing ecommerce and product photography:
Magic Wand Tool
The Magic Wand Tool selects a portion of your image that has the same or similar colors.
You can access the Magic Wand Tool by typing “W.” If you don’t see the Magic Wand Tool, you can access it by clicking on the Quick Selection Tool and selecting the Magic Wand Tool from the dropdown.
To use the Magic Wand Tool, click on a portion of your image that’s all one color (like the white background in the image of the sock below). The Magic Wand Tool will select the entire area of that color.
We’ve also put together a more detailed tutorial on how to use the Magic Wand Tool.
How to Replace or Remove an Image Background Using the Magic Wand Tool Learn more
Move Tool
The Move Tool is the first tool visible in the default Toolbar. You can also access it by typing “V.” The Move Tool shares space with the Artboard Tool, which you will see if you click and hold the Move Tool with the mouse.
The Move Tool does just what it sounds like: It allows you to move items in your image. If you’ve created a selection within your image, you can use the Move Tool to relocate it within the frame. If you don’t have a selection, the Move Tool will move the entire layer.
Images in formats like JPG and PNG are flattened images, which means the entire image rests inside a locked layer called Background. Because of this, the Move Tool can only move selections within flattened images and can’t move the locked layer itself. If you create a selection in a flattened image and move it, the area where the selection originally existed will be filled with the background color.
In layered images, you can use the Move Tool to move just about anything. Click on the portion of the image you want to move and put it in your desired location.
In Photoshop CC 2021, the Move Tool will automatically determine which layer that item is on when you click on it. In some older versions of Photoshop, you’ll need to select the layer that the item is on within the Layers palette before you can move it; otherwise, you’ll move whatever layer you’re currently in.
All items within the layer of the item you’ve selected will move with that item, unless you’ve made a selection. If you make a selection using any of the Adobe Photoshop CC 2021 tools covered below, you can move that selection with the Move Tool, independent of other items within that layer. The moved item will remain within its original layer.
Rectangular Marquee Tool and Elliptical Marquee Tool
The Marquee Tools make quick selections within your image.
By default, the Rectangular Marquee Tool is visible just under or beside the Move Tool, depending on how you have your Toolbar configured.
To access the Elliptical Marquee Tool, click and hold, and then select the Elliptical Marquee Tool from the dropdown. You can access whichever Marquee Tool is currently visible by typing “M.”
Rectangular Marquee Tool
With either the Rectangular Marquee Tool or Elliptical Marquee Tool selected, click and drag on your image to create your selection. The Rectangular Marquee Tool will create a rectangular selection; the Elliptical Marquee Tool will create an elliptical selection.
Hold down the SHIFT key while you click and drag to create a perfect square (Rectangular Marquee Tool) or perfect circle (Elliptical Marquee Tool). Release the mouse before you release the SHIFT key to keep the exact proportions of your selection.
Once you’ve created a selection with either of these tools, you can adjust that selection by moving it, filling it with color or deleting it.
To deselect your selection, click anywhere on your image, or type CTRL+D (CMD+D on a Mac).
Lasso Tool, Polygonal Lasso Tool and Magnetic Lasso Tool
The Lasso Tools, like the Marquee Tools, create a selection within your image.
Any of the three Lasso Tools may be visible in the Toolbar; click and hold on the visible tool to access the other Lasso Tools. You can access whichever Lasso Tool is currently visible by typing “L.”
With the Lasso Tool selected, you can draw a selection around any part of your image using your mouse. Click and hold the mouse button down as you draw. End the selection where you began to create a complete selection. The Lasso Tool can be a bit difficult to use if you need a precise selection, but it works well for creating a rough selection.
The Polygonal Lasso Tool creates a selection with straight lines. This tool offers a little more precision than the Lasso Tool.
With the Polygonal Lasso Tool selected, click on the point on your image where you want your selection to begin. Release the mouse and click again to create the first straight edge of your selection. Each time you click, you create another edge for your selection. To finish your selection, click on the same spot where you began.
The Magnetic Lasso Tool follows the edge of an object in your image, allowing more control in your selection than the Lasso Tool, and more flexibility than the Polygonal Lasso Tool.
To use the Magnetic Lasso Tool, click on the edge of your object where you want your selection to begin, and then follow the object as closely as you can with the mouse. The Magnetic Lasso Tool will snap to the edge of the object as you follow it.
You can click points as you go, as with the Polygonal Lasso Tool, but you can also make the selection without setting down any more points. To complete the selection, click on the first point you created with the tool.
Quick Selection Tool
The Quick Selection Tool selects an object in your image by interpreting and selecting along defined edges visible in your image.
If the Quick Selection Tool isn’t visible in Photoshop CC 2021, click and hold on the Magic Wand Tool and select the Quick Selection Tool from the dropdown. Once the Quick Selection Tool is visible, you can access it by typing “W.”
Over your image, the Quick Selection Tool will appear as a small circle with “+” inside of it. Place the cursor over an area of the object you wish to select and click. The tool will select a portion of your image, ending at any defined edges.
While holding the mouse, move your cursor around the rest of the object until the entire object is selected. If you let go of the mouse, you can simply click anywhere on the object again; you won’t lose the already-selected portions.
If you find you’re selecting too much of an image, the size of the Quick Selection Tool might be too big. You can use the “[“ and “]” keys to reduce and enlarge the size of your Quick Selection Tool, respectively.
If you need to start over with your selection at any time, type CTRL+D (CMD+D on a Mac) to deselect your selection.
Object Selection Tool
New to Photoshop 2020, the Object Selection Tool allows you to select an object within your photo simply by drawing a selection around the object.
To access the Object Selection Tool, click and hold on the Magic Wand Tool and select the Object Selection Tool from the dropdown. Once this tool is visible in the Toolbar, you can access it by typing “W.”
To use the Object Selection Tool, click and draw a selection around the object you want to select. Photoshop will interpret the edges of the object and attempt to refine your selection to just include the object.
When the Object Selection Tool is selected in your Toolbar, you have the option to select using a rectangular marquee shape or a lasso tool shape. You can toggle between the two in the Options Bar at the top of the application window.
The Options Bar also offers the same functionality to refine your selection as you would have using the Magic Wand Tool.
Fill Tools
Once you have created a selection with either the Marquee Tools, the Lasso Tools, or the Selection Tools, you can quickly fill that selection with a solid color or a gradient, or use what’s called the Content-Aware Fill Tool to seamlessly remove an object from its background.
The Paint Bucket Tool
The Paint Bucket Tool, sometimes referred to as the Fill Tool, is located on the Toolbar just under the Eraser Tool. If it is not visible, it may be hidden under the Gradient Tool.
To use this tool, select it and click anywhere within your selection. Photoshop will fill all pixels matching the color of the area you’ve clicked on with your foreground color. If you use the tool without creating a selection first, Photoshop will fill all pixels within your entire document with the foreground color. As with other tools, you can adjust settings such as Blending Mode, Opacity, and Tolerance in the Options Bar at the top of the application window.
Gradient Tool
The Gradient Tool, located in the same place as the Paint Bucket Tool, will fill a selection with a gradient instead of a solid color. Unlike the Paint Bucket Tool, however, the Gradient Tool will fill the entire selection with new color, regardless of the underlying pixel colors.
To use the Gradient Tool, select the tool and draw a line with the mouse over your selection. The angle of the line you draw will determine the angle of the gradient.
By default, the gradient will start with the foreground color and end with the background color, but you can change this in the Options Bar before you create your gradient.
Note that, if you do not have a selection created, the Gradient Tool will fill your entire document with the gradient.
Fill
You can also use the Fill function in Photoshop 2021 to fill a selection with a solid color or gradient. With your selection created, choose Edit > Fill from the menu at the top of the application window.
Crop Tool
The Crop Tool allows you to rotate and crop your image along predefined parameters. The Crop Tool is especially useful if you have a series of product images that all need to be the same size and orientation
Product Photo Size Requirements: How to Optimize Photos for Omnichannel Selling Learn more
The Crop Tool may be hidden behind the Slice Tool, Slice Select Tool or Perspective Crop Tool. If so, click on any of these tools and hold down the mouse until you can access the Crop Tool. When the Crop Tool is visible in the Toolbar, you can quickly access it by typing “C”.
With the Crop Tool selected, go to the top of the application window where you can control the Crop Tool settings. Select W x H x Resolution from the first dropdown option to specify the width, height and resolution of your cropped image. If you know all product images need to be 1000px x 1200px at 72 ppi, you would type those values into the fields just to the right of the dropdown.
Once you’ve set your width, height and resolution, click anywhere on your image to see the edges of the crop. You can use your cursor to expand or reduce the size of the cropped area, and you can also rotate the image within the crop by turning the edges of the cropped area at the corners.
If you’re happy with the crop area, click on any of the other tools in the Toolbar, and the image will automatically crop. If you are dissatisfied with the final cropped image, simply type CTRL+Z (CMD+Z on a Mac) to undo.
Eyedropper Tool
The Eyedropper Tool selects a specific color within your image and sets it as your Foreground Color.
If you can’t see the Eyedropper Tool, it could be hiding behind the Color Sampler Tool, the 3D Material Eyedropper Tool, the Ruler Tool, the Note Tool, or the Count Tool. You can click and hold on either of these tools to access the Eyedropper Tool. Once the Eyedropper Tool is visible, you can access it by typing “I.”
Click anywhere within your image to grab the visible color with the Eyedropper Tool. The color you select will automatically appear as a new Foreground Color.
The Eyedropper Tool is useful when you need to pull a color from one image and use it in another. For instance, when you have a background color that you need to match across images.
Brush Tool and Eraser Tool
The Brush Tool and Eraser Tool work as their names imply. Use the Brush Tool to “paint” on your image; use the Eraser Tool to erase part of your image.
If you don’t see the Brush Tool in the Toolbar, it might be behind the Pencil Tool, Color Replacement Tool, or Mixer Brush Tool. Click and hold on the Pencil Tool to access the dropdown, and select the Brush Tool. When visible, you can also access the Brush Tool by typing “B.”
Vary the size, shape, hardness (smoothness of the brush edge) and opacity of the Brush Tool at the top of the application window once the tool is selected. To “paint” with the Brush Tool, click and drag your cursor over the image.
Your cursor should appear as roughly the same size and shape as your selected Brush Tool preset — if it doesn’t, you probably have caps lock on. The Brush Tool will paint your foreground color onto your image within the layer that you currently have selected.
If you don’t want to paint over your original image, create a new layer and use the Brush Tool in that new layer.
The Eraser Tool works in almost the same way as the Brush Tool. If you don’t see the Eraser Tool in the Toolbar, it might be hidden behind the Magic Eraser or Background Eraser Tool. When visible, type “E” to access the Eraser Tool.
As with the Brush Tool, you can adjust the size, hardness and opacity of the Eraser Tool at the top of the application window.
Once you’ve adjusted your Eraser Tool settings, click and drag with your cursor over the portion of your image you wish to erase.
When you erase using the Eraser Tool on a flattened image, the background color will appear on the areas you erase. When you erase on a layered image, the pixels on lower images will be visible through the erased area of your image.
Magic Eraser Tool
The Magic Eraser Tool erases similar pixels from an image, in much the same way that the Magic Wand Tool selects similar pixels within an image.
The Magic Eraser Tool may be hiding the Eraser Tool or the Background Eraser Tool, if you can’t see it. Once visible, you can also select the Magic Eraser Tool by typing “E.”
To use the Magic Eraser Tool, click on the portion of your image that you want to remove, such as a background.
How to Remove Background from Hair in Photoshop CC18 Learn more
If all the pixels that you want to remove are a similar color, the Magic Eraser Tool will erase all of it in one click. Like the Magic Wand Tool, you can adjust the Tolerance of the Magic Eraser Tool at the top of the application window to select a smaller or wider range of pixel colors.
If you use the Magic Eraser Tool on a flattened image, the erased portion of your image will automatically fill with transparency, and your Background layer will be renamed “Layer 0”. If you use the Magic Eraser Tool on a layered image, the pixels from lower layers will be visible through the erased portion of your image.
As with the Magic Wand Tool, the Magic Eraser Tool is useful when you want to change or remove a background from a product image, or when you need to remove portions of an image.
Clone Stamp Tool
The Clone Stamp Tool allows you to select a portion of your image and repeat it into another portion of your image within the same layer.
If you don’t see the Clone Stamp Tool in the Toolbar, it may be hidden behind the Pattern Stamp Tool. If you can see it, access it by typing “S.”
You can adjust the Clone Stamp Tool the same way as the Brush and Eraser Tools — just adjust its values at the top of the application window.
With the Clone Stamp Tool selected, hover your cursor over the area of your image that you wish to repeat. Hold down the ALT key (OPTION on a Mac) and click on the image. The cursor will change shape and will appear as a target symbol.
Then, move your cursor to the new area of your image where you wish to duplicate the original portion of the image. Click and “paint” with your cursor; the portion of your image that you originally sampled will appear in the new area of your image.
The Clone Stamp Tool takes a bit of practice to master, but it’s useful once you become comfortable with it. You can use it to create multiple images of a single product within the same frame, or to remove blemishes or spots on a product’s surface.
Healing Brush Tool
The Healing Brush Tool selects a portion of your image and blends it into another portion of your image within the same layer.
Can’t see it? It might be hiding behind the Spot Healing Brush Tool, Patch Tool, the Content-Aware Move Tool, or the Red Eye Tool. If you can see it, you can access the Healing Brush Tool by keying “J.”
To use the Healing Brush Tool, hover your cursor over the area of your image that you want to sample. Hold down the ALT key (OPTION on Mac) and click on the sample area (the cursor will become a target symbol when you hold down ALT/OPTION).
Move your cursor to the area of the image that you want to blend your sample into. Click and hold your mouse to “paint” with your cursor in the new area of your image. The Healing Brush Tool will sample the original portion of your image and paint it over the new area of your image, blending the pixels together.
Like the Clone Stamp Tool, you’ll need some patience to become a pro with the Healing Brush Tool. But it could be a better option than the Clone Stamp Tool to remove spots or blemishes from a product image, depending on the image and what you need to do to it.
Dodge Tool and Burn Tool
The Dodge Tool lightens pixels in an image; the Burn Tool darkens pixels. With both tools, you “paint” onto your image with your cursor just as you would with the Brush Tool.
The Dodge Tool and Burn Tool share the same space on the Toolbar. If neither are visible, they’re probably suppressed behind the Sponge Tool. When visible, the Dodge Tool or Burn Tool can be accessed by typing “O.”
With either the Dodge Tool or Burn Tool selected, you can adjust the tool’s size and hardness using the options at the top of the application window. You can also choose the range of pixels you want the tool to affect.
Highlights: only very light areas of your image
Midtones: pixels with colors that are in between dark and light
Shadows: only the darkest pixels
Exposure controls the degree to which affected pixels change.
If you want to darken the shadows on a product image, select the Burn Tool, adjust the size of the tool to be roughly the same size as your smallest shadow, set the range to Shadows, and “paint” with the tool on your image where shadows already exist by clicking and dragging with your cursor.
Want to learn more about adding shadows in your shot? You can learn how to add a natural shadow in Photoshop.
To brighten the lightest areas of your image, choose the Dodge Tool, set your range to Highlights, and click and drag over the lightest areas of your image.
Hand Tool
The Hand Tool moves the portion of an image that you’re currently viewing.
The Hand Tool only works if you’re zoomed far enough into an image that one or more sides of the image are no longer visible. You can quickly access the Hand Tool by clicking “H.” If you are selecting the tool from the Toolbar, it may be located behind the Rotate View Tool.
With the Hand Tool selected, click and drag within your image to change your view. No elements of your image move when you use the Hand Tool; only your view of the image is affected.
The Hand Tool is useful if you need to zoom into a portion of an image, and then view another portion of that image without zooming out all the way.
Zoom Tool
The Zoom Tool allows you to zoom in or out of an image quickly. Access the Zoom Tool by clicking “Z.”
To use the Zoom Tool, click on the portion of your image that you want to zoom into. To zoom out, hold down the ALT key (OPTION on Mac) and click with the Zoom Tool.
The Zoom Tool is important to help refine small details that shoppers can see when zooming in. Zoom appears to be an important function for online stores — 100% of the fashion brands we analyzed had some sort of zoom feature for shoppers.
How to get the Toolbar back in Photoshop CC 2020
If you’ve undocked your Toolbar from the left side of the application window, you can make the Toolbar disappear by clicking on the “X” at the top of the palette.
If you accidentally make your Toolbar disappear, go to Window > Tools to make the Toolbar visible again.
You can also go to Window > Workspace > Reset [name of most recent workspace] to put all palettes, including the Toolbar, back into their default positions.
If your Toolbar and all of your open palettes disappear, you may have typed TAB. Type TAB again to make your Toolbar and palettes visible again.
Five Photoshop Tools to Take Your Images from Good to Great
A Post By: Barry J Brady
We hear it all the time, “That photo has been Photoshopped”. Sometimes it sounds like the photo has caught a disease or that Photoshop is some undesirable effect that has been added to the image. Photoshop is the KEY to making your good images look spectacular. Yes, I said “good” images. Photoshop is not about fixing mistakes or trying to rescue a bad shot. It is more about refining your images and making them look amazing without overdoing it. Photoshop is a fantastic tool when it is used effectively but can be your enemy when you overdo it. Depending on what you want to achieve with your photos, this quick guide to five Photoshop tools will help you adjust your exposure effectively and make the colour really pop out of your image.
NOTE: the examples in this article simply show you how to make the adjustments on a separate layer. You could also use an adjustment layer which gives you much more control over the adjustment. The only tool that can’t be used with an adjustment layer is Shadow and Highlights. I will go into more details about adjustment layers in upcoming articles, for now, if you follow these guidelines, your images will look compelling and rich without looking overdone.
1. Shadow and Highlights Tool
This tool will be used to get more detail in the shadow areas of your image. Modern cameras can capture lots of detail, but depending on the light in the scene you are shooting, the shadows may be a little dark. The Shadow and Highlights tool will bring back some of the details in those areas.
Open your image in Photoshop and go to: IMAGE > ADJUSTMENTS > SHADOW AND HIGHLIGHTS.
The tool will pop up and you will see this (as shown below), if you don’t see all these sliders, click “more options” to expand the box. You will use this tool to bring detail back into the shadows and you won’t be making any adjustments to the highlights. I find that the highlights part of this tool does not do a really good job, so I don’t use it at all.
The best way to work with the tool is to slide the Amount slider under the Shadows box to about one third across (33%). Then slide the Tonal Width slider to directly under the Amount slider. Lastly bring the radius slider to directly under it. In most cases, you will want to have these sliders directly under each other (see screenshot below right).
The important thing to remember here is to make the adjustments and take careful note of your image has been affected. Click on the preview button on the right hand side of the tool (you can do this with all the tools in this article) to see the “before and after”. You will be able to see at a glance how your changes are working. If you need to extract more detail from the shadows then slide the Amount slider to the right even more but make sure you line the other two sliders underneath it.
The amount that you decide to adjust the shadows is up to you. Be careful not to overdo it. Once you start seeing a “glow” around certain parts of your image, you may have gone too far. This glow is often referred to as a halo which can be avoided by watching carefully how your adjustments are affecting your image. If you see them appearing, simply drag the sliders back to the left until they disappear. Once you are happy, click OK.
2. Levels Tool
With your image open and the shadows adjusted, you will now adjust the overall exposure in the scene. If your image is a little over or under exposed, the levels tool can fix that. Go to: IMAGE > ADJUSTMENTS > LEVELS on the menu bar (or using the keyboard shortcut Command/Control+L). You will see the LEVELS dialogue box pop up and it will have a graph in it. This graph is called a histogram.
A histogram is simply a graphical representation of the pixels in the scene. If the graph is pushed over to the left side it means that your image has more darker tones in it, if the graph is over on the right side it means that your image has more brighter tones. There is no right or wrong histogram, it is simply a representation of the light in your scene. There are some great articles about histograms on the dPS site, so if you want to learn more about them, click on one of the links above.
The important thing to remember when working with levels is to make sure you don’t adjust your image so much that it causes the image to become under or over exposed. Thankfully, Photoshop gave us a way to see if that is happening, which I will explain shortly. Firstly, you will notice there are three sliders on the bottom of the histogram. The slider on the right is white (adjusts highlights) the slider in the middle is grey (adjusts mid tones) and the slider on the left is black (adjusts shadows). The levels tools will help adjust contrast and colour in your image. You can start the process by clicking and dragging the white slider in (move it to the left) to touch the edge of the histogram. Do the same for the black slider (drag it to the right). Your image will already look better.
Then you can move the middle slider to the right or the left to see which works better. Small changes always work best, so don’t make extreme changes on each slider. If you want to see how your adjustments are affecting your image, hold down the ALT key (PC) or OPTION key (Mac) while you click on the white or black slider. When you click ALT and hold down the white slider, the image will go black. As you slide to the left, you will see some red areas in your image (see above). When you see this, Photoshop is showing you which parts of the image will be overexposed, or clipped. The opposite is true for the the black slider. If you hold down ALT and click on the black slider, the screen will go white and as you slide to the right, the areas that come up on the screen will be underexposed, or clipped. It is a good idea to use this function if you are not sure if you have overdone your adjustments in Levels.
3. Colour Balance
This is a good tool to use to change the overall colour in the image. If your image is too blue and want you want it to be warmer, then you can do that by pulling up the red tones. Also, if your image has an undesirable colour cast, maybe the overall colour of the scene seems too green, then you can correct that by using this tool. The colour balance tool is found in the top menu bar under IMAGE > ADJUSTMENTS > COLOUR BALANCE (or using the keyboard shortcut Command/Control+B).
Once the dialogue box is open, you will see three sliders (as above). The sliders represent the visual colours in the image, and are set in the middle by default. By moving them to the left or the right you will be able to change the colour in the image. The top slider affects Cyan/Red, the middle slider works on Magenta/Green and the bottom slider is Yellow/Blue. The colour will change according to which slider you choose and how far left or right you move it.
Note: you can also choose which area of your image to affect as in the Shadows, Midtones or Highlights but selecting the appropriate button in the Tone Balance section below the sliders.
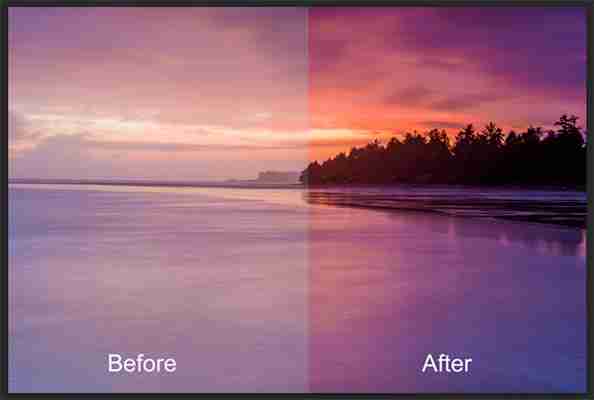
You will want make small adjustments here too. A big adjustment can make your image look over saturated with a particular colour and that will look unnatural. The idea is to enhance your image by boosting certain colours in the scene. So, if you have a sunset image (as below) you may want to boost the reds, yellows and magentas. That will make your image look warm and will give the scene some colour boost.
4. Hue and Saturation
One of the most powerful colour tools in Photoshop is the Hue and Saturation tool. To open it go to: IMAGE > ADJUSTMENTS > HUE/SATURATION (or using the keyboard shortcut Command/Control+U). This tool can be used very effectively to adjust all the colours in your image. When you open the tool, you will notice that there are three sliders again, namely Hue, Saturation and Lightness.
Hue means colour, this is not used very often as it will reassign the colours in your image, what you want to use this tool for is saturation. Saturation controls the richness or intensity of the colours in your image. Above the three sliders you will see a drop down box called Master. If you click on this, you can choose the colours that you want to saturate. This gives you very fine control over each colour in your image. You can select each colour individually and adjust it according to your preference. You may want to saturate the reds and yellows more than the blues, as an example, this tool allows you to do that. It is good to know that you are not adding colour to your image, you are saturating the colours that are there. Again, incremental adjustments are key. Don’t overdo it, small adjustments throughout this process will make your image look more natural and more dramatic
5. Vibrance
The vibrance tool is found under IMAGE > ADJUSTMENTS > VIBRANCE (no shortcut). It effectively saturates colours that are not completely saturated. This is a good finishing touch to your image editing to make sure your image gets a final boost. There is no real guideline as to how much you should adjust on this tool, but be aware of how it is affecting your image. Once this step is complete, your image should look remarkably different and if done correctly, the viewers won’t be saying those dreaded “Photoshopped” words.
In Conclusion
These five tools will help you make your good images spectacular. The important thing to remember in Photoshop is to make adjustments incrementally. As you can see from this process you slowly and incrementally make changes but the overall effect is dramatic without looking overdone. There are many other tools in Photoshop that can add even more enhancement to your images (I will be doing articles on those over the next few months) but start with these and get comfortable with how they work. To summarize, in Photoshop, slower is better and many small adjustments make a more dramatic impact on your image than a few large adjustments. Enjoy and experiment and as always, let me know what you think in the comments below.
Top 10 Essential Tools in Photoshop
Graphic designing has become an essential option today. Be it any company of any industry, everybody is embracing the presence of graphic design strongly. There are some leading software available that a designer has to master in order to be a successful Graphic designer.
Today, in this blog we are going to talk about one of the leading image editing software which is ruling the industry since its inception – Photoshop
Backed by Adobe, Photoshop is a powerful raster based image editing software that gives creative freedom to its users to explore the extended side of creativity. People are using it not only for commercial purpose but it has become a household tool for everyone too!
Photoshop has transformed the digital editing platform by bringing the revolution in graphic industry. It has gained popularity and designers are using it for several purposes.
Photoshop has become a mandatory tool for designers and to successfully lead the industry, one has to master it. Today in this blog, we’ll be discussing about:
The Top 10 Essential Tools in Photoshop :
1. Selection Tools
Save
The first tool that we are going to discuss is selection tool. The selection tool is used to create selection of any object or image. This tool is considered as one of the essential tools of photoshop. Within selection tool there are several tools available for designers to choose as per their convenience like
Rectangular marquee, elliptical marquee tool, polygon selection tool, lasso tool and others.
2. Brush Tools
Save
Brush tool works as a digital paint brush. It basically works like traditional painting tool. In Photoshop, designers get option of various brush tips to choose from . They can adjust their diameter, rotate the angle and can maintain the hardness and smoothness of the brush according to their requirements
Photoshop offers a gallery of brush tips. Other than that, you can also download different brush sets from various websites available on the internet.
You can also modify the flow and opacity of the brush through brush property panel. Where opacity control the transparency, the flow control the amount of color applied.
3. Crop Tool
Save
As the name suggests, crop tool let you crop a part of image or object. To activate crop tool you can press ‘C’. It is one of the popular tools designers used to remove the unwanted area of the image.
4. Spot Healing Brush Tool
Save
Photoshop is ruling the image editing industry with its powerful editing tools. Photoshop offers advanced retouching palette to correct the image imperfections. Spot healing brush tool is one of the retouching tools available in photoshop.
The spot healing tools works by automatically taking the samples from the surrounding area and then you can adjust the uneven skin with it. This is a not to skip tool and should be included in an ideal Photoshop course for photographers.
5. Healing Brush Tool
Save
Similar to spot healing brush tool, healing brush tool allows you to correct the blemishes, uneven skin tone and imperfections of the image by taking samples.
The only difference in between these two is in spot healing tool, it detects the sample automatically but in healing brush tool,one has to take sample manually.
6. Clone Stamp Tool
Save
Clone stamp is used to copy a certain area of the image to another. With the help of clone tool you can duplicate a certain part of the image and then you can place it on any image of the same mode.
7. Gradient Tool
Save
You can blend two or more colors using the gradient tool. Gradient tool allows the designers to smoothly merge multiple colors into one.
You can select Gradient tool by pressing ‘G’ there are total 5 types of gradient available in Photoshop : Linear, radial, angular, diamond and reflect gradient
8. Pen Tool
Save
Pen tool is vital part of Photoshop that is used to create selection and path of certain area. Initially people find it hard to operate the pen tool but once you get comfortable with it, you can create wonders with the tool.
9. Dodge and Burn Tool
Save
Dodge and burn tool is part of image editing palette in Photoshop. You can make areas dark or light using these tools. They help you to adjust the highlights, shadows and midtones of the image.
It is always advisable to use them in a limited manner to avoid image destruction.
10. Blur and Sharpen Tool
Save
Blur and sharpen tool as the name suggests, are used to blur or sharpen the image pixels. Using blur tool, you can modify any sharp areas or edges in the image. The sharpen tools works in the same way. You can use it to highlight certain areas of image
for example, you can use sharpen tool on certain model to make her/ his eyes and brows sharp and can use the blur tool on areas like hairs, lips to make them little smoother.
So these are the top 10 tools that Photoshop offers to designer. Besides this, there is so much in Photoshop that you can explore like layer masking, filter gallery, blending modes, layer styles etc to master this software.
As a leading Graphic design training institute in Delhi, Graphic Design Institute offers excellent courses in Photoshop. We have Photoshop courses specially curated for everyone in the industry. Whatever your need is we teach according to that. We have special Photoshop courses for web students, architecture students, Graphic students, fashion design students, photographer and basically for everyone out there.
So that’s for all now. Stay tuned with us for more informative blogs.
Till then, keep exploring!
Similar Blogs:
Infographic on Top 10 Essential Tools in Photoshop :


