
The Top 10 Most Important Tools to Learn to Master Photoshop
While Photoshop is an incredibly powerful application that is packed with tools to help you edit and manipulate images, I have found that most people only end up using a small fraction of Photoshop’s tools on a daily basis. In this article, I’ve pulled together a list of tutorials to help you master 10 of Photoshop’s most-important tools. By mastering these tools, you’ll be able to edit and manipulate just about any type of image in Photoshop. Let’s take a look!
1. Selections
If you are working with Photoshop for the first time, the first concept that you should learn is the concept of making a selection. Simply put, by making a selection, you are telling Photoshop to grab a group of pixels so that you can make adjustments to them. In Photoshop, you can do a lot of things to selections of pixels. You can change their color, move them, re-size them, or delete them. Below, I’ve included several tutorials showing how to make and modify selections in Photoshop.
How to Make Fast But Precise Selections – Tuts+
10 Ways to Modify a Selection in Photoshop – Tuts+
Making Complex Selections (Part 1) – Tuts+
Making Complex Selections (Part 2) – Tuts+
Natural Selections – Tuts+
2. Masking
Masking is probably the most important concept to understand. Masking is the act of showing or hiding pixels. When you apply a mask to an object in Photoshop, you are telling Photoshop which pixels to show, and which to hide. By placing white onto a mask, you are telling Photoshop to show the pixels behind that mask. By placing black onto a mask, you are telling Photoshop to hide the pixels behind that mask. These tutorials will explain everything you need to know about the different types of masks available in Photoshop and how to use them.
The Answer to All Your Problems: Masking – Tuts+
What is a Clipping Mask Then – Tuts+
How to Work With Vector Masks in Photoshop – Tuts+
3. Brush Tool
When most people think of brushes, they probably immediately think of painting. While Photoshop is an amazing digital painting application, the Brush Tool’s most useful function isn’t actually for digital painting or illustration, in fact, the Brush Tool is usually most useful when used on masks or Adjustment Layers. These tutorials will explain everything you need to know about using Brushes in Photoshop.
10 Things You Must Know About Photoshop Brushes – Tuts+
Start Using the Brush Tool – Tuts+
The Brush Panel and Using a Tablet – Tuts+
4. Adjustment Layers
Adjustment Layers allow you to make changes to a pixel’s color or tone. You can use an Adjustment Layer to add contrast, adjust color, to convert an image to black and white, and much more. Below, I’ve included a couple introductory tutorials to help you get started with Adjustment Layers. If you’re looking for a more comprehensive series of tutorials that go into much more detail, this series, titled The Ultimate Guide to Adjustment Layers by Martin Perhiniak will explain everything you need to know.
Introduction to Adjustment Layers – Tuts+
How To Use Adjustment Layers In Photoshop – Phlearn
5. Clone Stamp
If you edit or retouch photos a lot, the Clone Stamp tool will be essential. The Clone Stamp tool allows you to sample pixels from one part of an image and paint those pixels onto another part of an image. You can use this tool to remove blemishes from a photo or even to delete objects from a photo all-together. This tutorial from Phlearn is a great place to start if you want to learn more about how to use this tool.
How to Master the Clone Stamp Tool in Photoshop – Phlearn
6. Layers
Layers are one of Photoshop’s most powerful organizational tools. By stacking layers on top of each other, Photoshop gives you the ability to not only work non-destructively, but to also organize your PSD file in a way that will make sense to anyone that views it.
Introduction to Layers in Photoshop – Tuts+
10 Things You Didn’t Know About Photoshop Layers – Tuts+
Secrets of the Layer Panel (Part 1) – Tuts+
Secrets of the Layer Panel (Part 2) – Tuts+
7. Blend Modes
Blend Modes in Photoshop allow you to blend your layers together in interesting ways. By setting the Blending Mode of a layer you can tell Photoshop to apply different behaviors to the color and tones contained within that layer. These tutorials are a great place to start.
A Breakdown Of Blend Modes – Phlearn
Using Layer Blending Modes In Photoshop – Phlearn
8. Transformation Tools
Photoshop gives you some powerful tools to help you re-size, distort, transform, and warp your images. Use these tools to help you push pixels around, and move them into place. The following tutorials explain several of Photoshop’s different transformation tools.
How to Use the Photoshop Free Transform Mode – Lynda
Photoshop Transform Tool Tips and Tricks – Tip Squirrel
Using the Free Transform and Warp Tools – Lynda
Warping, Distorting & Directly Manipulating Images – Adobe
Perspective Warp in Photoshop CC 14.2 – Howard Pinsky
Look at the Big Picture With Adaptive Wide Angle in Photoshop CS6 – Russell Brown
9. Liquify
Retouchers often depend on the Liquify Tool to help them push pixels around on a screen. You may have seen people use the Liquify tool in the past to make some pretty drastic edits to a photo, but for the most part, the Liquify tool is best used in moderation. This tutorial from Phlearn is a great demonstration of how to use the Liquify tool in Photoshop.
Shape Hair Using the Liquify Tool in Photoshop – Phlearn
10. Crop Tool
The Crop Tool is probably one of Photoshop’s most popular features. Cropping is the act of trimming off the edges of a photo and is most often used to change the aspect ratio or to size an image to smaller dimensions. This tutorial from Tutvid will explain how the Crop Tool works in Photoshop CS6 and above.
10 Essential Tools & Tips All Photoshop Beginners Should Learn
Are you new to Photoshop? We're here to help!
Learning Photoshop takes time, and there are so many things I wish I knew when I first started. So today, I'm bringing you ten helpful tips to make designing with Photoshop a whole lot easier! Learn about essential tools and tricks any beginner can master.
Begin your journey with a template! Sign up to Envato Elements to unlock thousands of premium templates, photos, and more.
Or why not learn how to use Photoshop the easy way, by watching three hours of detailed video instruction taking you through every aspect of the software, from layers and masks through to retouching and exporting.
1. Discover Your Favorite Tools
This is Photoshop's Tools panel.
Press on the double arrow to view the toolbar at one or two-rowed view.
Did you know you can customize it?
Though many of its greatest tools are in plain sight, if you only stay on the toolbar's surface, you may miss out on the extras hidden beneath the lower right triangles.
So customize the toolbar as a helpful reminder to try out new tools!
Go to Edit > Toolbar to drag and drop your tools. Group them according to different priority levels dedicated to learning or actual use.
Don't overload your panel with unused tools. Customize it with your favorites!
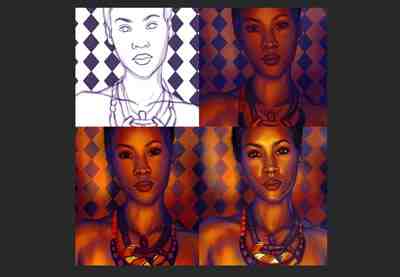
Establish Your Core Set
You won't need every tool for every situation. So it's important to build a strong foundation with a few flexible tools that work in a variety of scenarios.
Here are two different projects: a digital painting and a photo manipulation. Notice how the tools I used are similar?
While the first project is solely an illustration, the second still depends heavily on my illustrative skills. So don't panic if you don't know these tools yet! Your core set should reflect your own design, photo, or illustrative interests.
Keep in mind that many of Photoshop's tools also serve more than one purpose. You can use the same Pen Tool to extract your friend from a photo that you would use for a vector illustration.
Use the pen tool for a cute cat or a double exposure bird illustration.
There are other tools that you'll need too, but think of them as secondary. The Pan and Move Tools, for instance, may not seem as creative as brushes, but they're needed (often a lot more) for a better workflow.
What are your core tools?
In the beginning, you'll always have a favorite. But as you progress, challenge yourself to try out new tools with creative experiments.
Learn more about Photoshop tools:
2. Get to Know the Layers Panel
Control-Shift-N to create a New Layer.
The Layers panel is efficient and helpful. It'll change the way you think about design by showing you endless results in Photoshop.
But how does it do it?
Well, the panel gives you control over several options. Opacity, Fill, and Color are just a few. You can use these settings to modify your layers for many awesome effects.
Text effects, for instance, often use brilliant Layer Styles to achieve their result.
At first, you'll probably use the Layers panel for its basic function, to hold your artwork in separate layers, but I really recommend studying it further. Explore the panel as much as you can and discover new ways to make detailed designs.
Having trouble with color? Study Layer Blend Modes.
Need a brighter result? Try an Adjustment Layer.
3. Save Time With Layer Masks
It's time we had the talk—the talk about Layer Masks.
Though often confusing for beginners, layer masks are essential for smart editing.
To use a Layer Mask:
Here I painted a circle in the center of the mask to reveal the white background underneath.
Go to the Layers panel and select a layer. Then click on the Layer Mask button. Using the tool of your choice, apply white or black to the layer mask to hide or reveal parts of that layer. In this case, I used the Selection and Paint Bucket Tools.
Use layer masks for any project! Incorporate them into your routine for non-destructive editing.
Most of the time, the struggle with this option comes from not understanding when to use it. Beginners will often reach for the Eraser Tool instead for a quick solution.
So learn the difference between the Layer Mask and the Eraser Tool:
You can also use masks to create an isolated object. Then insert them into your work. Learn how to create one with this quick video:
4. Control-S Properly
To Save or to Save As? That is the question.
Quality matters. So before you save and close, consider a few things first:
What do I need this file for?
Where can I store it?
Which format do I need it in?
How should I save it for the best quality?
Side-by-side comparison of different quality levels. 83% versus 1% quality. Image from Envato Elements.
What and Where
Whether or not your design will be used online is a huge part of the answer to the first question. Visuals for online posts can sacrifice some quality, while printed materials require high-resolution files. Research printing guidelines to understand important settings like Color Modes to learn how to navigate these scenarios.
Store your files in a location on your computer that you can access easily. Photoshop may display an error if a file is missing certain elements (like fonts), so try your best to keep everything together.
Format and Quality
Now that you know what the design is needed for, you can proceed by saving it at the right format and size. Many designers will save their work in several formats for more flexibility.
To Save for Web:
Go to File > Export > Save for Web.
Explore how your work looks under different compression settings. Avoid quality loss! Learn how to manage jpeg compression for social media posts:
5. Know Your Digital vs. Printing Guidelines
Will your designs print well?
Another big reason you should save your work in several formats is to understand print quality. If you paint, design, or edit with bright neon colors, for instance, you may be disappointed by the physical result.
Minimalist design is a huge trend, partly because of its versatility for printing. Clean designs are often easier to print and therefore more widely prevalent in the industry.
Business Card template from Envato Elements (no longer avaliable).
What looks great online doesn't always look great on paper. There are many reasons for this, but one great factor is how the ink actually prints onto the paper. And knowing the difference between RGB and CYMK Color Modes will be crucial to this step.
Not sure where to begin? Learn more about Color Modes in this quick video:
Design for your situation. To access/change the Color Mode of your file, go to Edit > Color Settings.
Test out your designs by getting them professionally printed! Learn how to work with local printers for the best result.
Need a few beginner tutorials on print design? Check these out:
6. Presets! Presets! Presets!
In the real world, there are tight deadlines and frustrating creative blocks. So save valuable time by using one of Photoshop's built-in presets!
Presets are available for brushes, shapes, patterns, and more. Add a quick filter to a photo, or create a brochure with abstract elements.
To view them all, go to Edit > Presets > Preset Manager.
Each category will display a new list of presets, but you can access even more by going to the drop-down option in the upper right corner.
Some of my favorite presets to use are the Brushes. Brush packs from your favorite artists are great too, but take advantage of the ones you already have!
These presets include varying textures, beautiful gradients, and more.
Here is an example of the Wet Media Brushes preset pack.
Use presets for incredible effects! They're already organized for your convenience, so all you have to do is load them and go.
Need some inspiration? Try out these tutorials below:
7. Change Colors Easily With Adjustment Layers
Create magical lighting schemes with a few short clicks!
Adjustment Layers are perfect for beginners to Photoshop. They allow you to change so many visual aspects of your work without all the fuss.
Need to save the original photo? No problem. Non-destructive tools like Adjustment Layers and more help you create incredible effects without any quality loss.
To use a Color Lookup Adjustment Layer:
Go to Layer > New Adjustment Layer > Color Lookup. Select a preset from the drop-down list for the 3DLUT File. Click OK to enjoy the result.
Woman stock from Envato Elements.
As one of my favorite tools, I love that adjustment layers work great for digital illustrations too!
Digital artists use these adjustments to try out different color palettes before committing to a final decision. Explore different lighting arrangements and more with incredible tools like Curves.
Learn more about Adjustment Layers with these tutorials:
8. Learn How to Arrange Your Workspace
Chefs love clean kitchens. It adds to their overall cleanliness and productivity. So why not create a clean workspace for yourself in Photoshop?
Organization is conducive to a healthy work environment. And even when it feels very artistic to be messy, an organized workspace can help improve your work.
First, close out of all those extra tabs!
After that, there are many ways you can make things even tidier. Dock and undock your favorite toolbars and panels to get started.
Then go to Window > Arrange.
Choose from the different list options to help display your Photoshop documents neatly. Keep inspiration nearby for easier access.
The standard is to Consolidate All to Tabs, but you can also use options like 2-up Vertical to display references next to illustrations.
Need to reset your workspace? Go to Window > Workspace > Reset Essentials.
Every artist's workspace is different. Some may want to see more panels than others. I typically like less to minimize clutter. But no matter your preference, you can create the environment you need for successful design.
9. Conquer the Pen Tool
The Pen Tool (P) can be quite intimidating, but you can master it completely with time.
First, study the tool itself. The Path setting is great for creating selections while the Shape setting allows you to create custom shapes.
Then get to know the Path Operations, Alignment, and Arrangement options. Designers who are more experienced with Adobe Illustrator may have an easier time with this.
In fact, our very own Yulia Sokolova creates brilliant flat designs using this tool. Check out one of her tutorials below:
The best way to master anything is to experiment! Create tons of lines and swirls and play around with different settings under Blending Options. The possibilities are truly limitless! Remember to use the Pen Tool to create awesome text effects, illustrations, and more!
Got a minute? Learn more about the Pen Tool with this quick video:
10. Memorize Keyboard Shortcuts
Keyboard shortcuts aren't new.
But designers still have trouble remembering them. Want to learn a quick trick to improve your memory of keyboard shortcuts?
Try this ancient mind trick to help think of the tools. When you think of a keyboard shortcut, think of a visual that explains what it is or how it's used.
Hitting the letter B, for the Brush Tool, automatically makes me imagine this:
Memorize keyboard shortcuts according to priority level. Just like our first tip, it's important to establish which shortcuts you'll need the most. You'll also need to memorize additional shortcuts pertaining to your favorite tools.
To increase Brush Size, for instance, hold the left or right brackets: [ or ].
Your favorite keyboard shortcuts will be easy to memorize because you'll use them often, but you should also explore new options.
Want to create things a lot faster? Study these keyboard shortcuts to improve speed and creativity:
Need More Tips?
You won't master Photoshop in a day―and that's perfectly fine! I like to think of it as a creative journey that gets better with time.
Before you go, remember to:
Establish your core tools. Get to know the Layers panel. Save time with Layer Masks. Save files properly. Know your digital vs. printing guidelines. Use presets... ... and Adjustment Layers. Learn how to arrange your workspace. Conquer the Pen Tool. Memorize keyboard shortcuts.
Try out these tips and tools and let us know your favorites in the comments!
For more beginner Photoshop tutorials, check out these links below:
Beginner’s Guide to Photoshop Tools
Adobe Photoshop is a raster-based image editing software. It was originally developed by the American brothers Thomas and John Knoll in 1987 and then later Adobe.Inc brought the license to distribute in 1988. It is available for both macOS and Windows operating systems. Here, raster is a combination of pixels. A group of pixels forms a graphic called Raster Graphics. Photoshop is used to create or edit images, posters, banners, logos, invitation cards, and various types of graphic designing work. It is widely used in industries. The default file format of photoshop is .PSD, Photoshop document. It provides various tools for designing and editing.

Tools in Photoshop
As we know, Photoshop provides various types of tools. So, some of the commonly used tools are:
1. Move tool
This tool is used to move the selected area or the entire layer simply by dragging it with your mouse or using your keyboard arrow keys. Using this tool, you can move the selected area anywhere in the image according to your requirements. By default, this tool moves the selected area and if the area is not selected, then it will move the entire layer. You can select move tool from the tool palette or just hold down the Ctrl key in windows and Command key in mac, to activate it.
Example:
Step 1: Open an image in Photoshop.
Step 2: Select the part of the image that you want to move using any selection tool.
Step 3: Select the Move tool from the tool palette.
Step 4: After selecting the move tool just hold the left click on your mouse and drag the selected section. And put that selected part to anywhere in the image. That’s all you have to do to use this tool.
2. Rectangular Marquee tool
This tool is also a selection tool. Using the Rectangular Marquee tool, you can make a rectangular-shaped selection or geometric shapes. You can select the Rectangular Marquee tool from the tool palette.
Example:
Step 1: Open the image in Photoshop.
Step 2: Select the Rectangular Marquee tool from the tool palette.
Step 3: After selecting the Rectangular Marquee tool just hold the left click on your mouse and drag on the image layer, then it will create a rectangular selection on the image layer and that’s all you have to do to use this tool.
3. Lasso Tool
This tool is also a selection tool. This tool allows you to draw a freehanded choice border around the object you wish to pick out in your image. You can select the Lasso Tool from the tool palette or the shortcut for the lasso tool is L.
Example:
Step 1: Open the image in Photoshop.
Step 2: Select the Lasso Tool from the tool palette.
Step 3: After selecting the Lasso tool now click on the image from where you want to draw and just draw a selection with the help of the cursor just like drawing on paper with a pencil by pressing the mouse pointer. On releasing the pointer our drawing will turn into a selection like as shown in the below image and that’s all you have to do to use this tool.
4. Crop Tool
This tool allows you to choose an area of an image and discard everything outside this area. It also straightens photos in Photoshop. The cropping process does not alter the size of the image content. It is a non-destructive tool, and you can also choose to retain the cropped pixels to optimize the crop boundaries later. You can select the Crop Tool from the tool palette.
Example:
Step 1: Open the image in Photoshop.
Step 2: Select the Crop Tool from the tool palette.
Step 3: After selecting the crop tool you will get a rectangular box on your image using this rectangular box you can adjust the size of the area that your want to crop and that’s all you have to do to use this tool.
5. Object Selection Tool
It is also a selection tool. It simplifies the way you’ll be able to choose an associate object or maybe a part of an associate object in a picture. Photoshop already has a Subject choice tool. However, it’s supposed to pick out all subjects within the image. This tool lets you identify the object by making a rough selection around the image. Once you have drawn the selection, it automatically shrink-wraps the selection to the edges of your object. You can select the Object Selection Tool from the tool palette.
Example:
Step 1: Open the image in Photoshop.
Step 2: Select the Object Selection Tool from the tool palette.
Step 3: After selecting the Object Selection tool, draw a rectangle box using this tool and it will automatically detect the object from the image like as shown in the below image and that’s all you have to do to use this tool.
6. Frame Tool
This tool allows you to draw placeholder frames that you will simply fill with pictures. You can simply choose the Frame Tool from the Tools panel or press K from the keyboard.
Example:
Step 1: Open Photoshop.
Step 2: Select the Frame Tool from the tool palette.
Step 3: After selecting the frame tool, draw a frame and in that frame, you can add an image according to your requirement.
7. EyeDropper Tool
In Adobe Photoshop, the eyedropper tool is one of the easy-to-use tool. It is generally used by digital painters, editors, and other people who use Photoshop. This tool is used to select a color from an image or any Photoshop document and add them to your Swatches panel.
Example:
Step 1: Open the image in Photoshop.
Step 2: Select the eyedropper Tool from the tool palette.
Step 3: After selecting the eyedropper tool, put your mouse over the image and click to pick the sample image. A ring will appear on the screen like as shown in the below image and that’s all you have to do to use this tool.
8. Patch Tool
This tool is used to remove spots and marks from the images. Or in other words, It is used for painting and retouching images like removing big scar or an oversized space of skin. This tool is generally hidden behind the Healing Brush tool within the Tools panel.
Example:
Step 1: Open the image in Photoshop.
Step 2: Select the Patch Tool from the tool palette.
Step 3: After selecting the patch tool, draw a circle on the area that you want to remove and drag that circle to the new area, and when you release your mouse you will see the changes. Like as shown in the below image here we remove the hole from the leaf using this tool.
9. Brush Tool
The brush tool is the most commonly used tool in Photoshop almost every Photoshop user uses this tool. This tool is just like the brush in the real world. It is used to paint canvas in Photoshop.
Example:
Step 1: Open the image in Photoshop.
Step 2: Select the Brush Tool from the tool palette.
Step 3: Now we select green color(or any color) from the palette.
Step 4: After selecting the brush tool just hold the left click on your mouse and drag over the image. It will start painting and that’s all you have to do to use this tool.
10. Clone Stamp Tool
This tool is helpful once you have to copy the same detail and color from one part of a picture to a different space image. With this tool, you’ll be able to use an associated empty layer to keep your retouching break away the most image
Example:
Step 1: Open two images in Photoshop.
Step 2: Select the clone stamp tool from the tool palette.
Step 3: After selecting clone stamp tool, now position the cursor over the section that you want to clone(in image 1) and then press Alt key in windows or option key in mac to define the clone source. After defining the clone source now place your cursor on the section(in image 2) where your want to paint the cloned pixel and then start painting.
11. History Brush Tool
This brush uses a previous state of a picture. The tool makes a replica of the image because it was during a previous state and so uses this copy’s content to color with.
Example:
Step 1: Open the image in Photoshop.
Step 2: Select the history brush Tool from the tool palette.
Step 3: After selecting history brush Tool just hold the left click on your mouse and drag over the image. It will give the previous state of the image and that’s all you have to do to use this tool.
12. Eraser Tool
This tool is the most commonly used tool in Photoshop. It will create clear constituents or match them to the background image color. Or in other words, this tool is used to change the color of the pixels either in the background color or to a transparent.
Example:
Step 1: Open Photoshop.
Step 2: Select the eraser tool from the tool palette.
Step 3: After selecting the eraser tool, just simply hold left click of your mouse and erase the area that you want to remove from your image like as shown in the below image:
13. Gradient Tool
This tool allows you to form a gradual transition between two or additional colors by exploiting the Gradient Tool. This tool may be applied to any designated space of a picture. If no space is chosen, the gradient is applied to the whole layer.
Example:
Step 1: Open Photoshop.
Step 2: Select the gradient tool from the tool palette and apply the gradient effect on your image.
14. Blur Tool
The Blur Tool is employed to color a blur impact, each stroke made exploitation. This tool can scale back the distinction between affected pixels and make them seem blurred. The context-sensitive choices Bar, typically placed at the highest of your space, can show all relevant choices associated with the Blur Tool.
Example:
Step 1: Open the image in Photoshop.
Step 2: Select the Blur Tool from the tool palette.
Step 3: After selecting blur Tool just hold the left click on your mouse and drag over the image. It will blur the image and that’s all you have to do to use this tool.
15. Dodge Tool
The Dodge tool and also the Burn tool lighten areas of the image. Dodge tool happen supported a room technique for control exposure at specific areas of a print.
Example:
Step 1: Open the image in Photoshop.
Step 2: Now select the area in the image using any selection tool, here I use the object selection tool.
Step 3: Select the Dodge Tool from the tool palette.
Step 4: After selecting Dodge Tool just hold the left click on your mouse and drag over the image. It will lighten the darker area in the image and that’s all you have to do to use this tool.


