
A Beginner’s Guide to Adobe Photoshop
Adobe Photoshop can be overwhelming to use for many beginner photographers. We decided to put together a detailed guide that goes over the basics of the most popular, and arguably most powerful post-processing tool on the market.
Many of us have heard others say something like “This image is photoshopped” at least once. Even non-photographers use this phrase all the time when referring to digitally-manipulated images. In other words, Photoshop has become synonymous with post processing.
The Complexity of Photoshop
Even though there are many tools for processing an image, very few have come close to Photoshop in terms of features and functionality. Without a doubt, Photoshop is a vast and complex piece of software, and there are so many built-in and third party tools available for it, that it would be impossible to try to learn it all. In fact, Photoshop’s tools evolved so much over the years, that one could get similar results using very different tools.
If you search online for a way how to get something done in Photoshop, you might be overwhelmed by what you find. In many cases, photographers end up showing a number of different techniques to get to the end result, which can be very confusing, especially for those who are starting out.
This very nature of Photoshop demands a steep learning curve. I haven’t come across anyone who can say “I know everything in Photoshop”. Instead of trying to learn everything about the software, many of us choose to only learn the particular tools that we actually need on a day-to-day basis. This is the right way to learn Photoshop.
Once we learn a particular tool in Photoshop, it does take time and practice to put it to use. It might be a slow process, but once you get used to it, the results are highly rewarding.
So please keep in mind that this article is not meant to be a complete guide to Photoshop. Instead, I wrote this article as a foundation that hopefully makes it easier for our readers to understand some of the basics.
Lightroom vs Photoshop
Serious photographers rarely ever publish images straight out of their cameras, so the journey is usually started with basic post-processing tools like Lightroom. It is important to note that there is a huge difference between Lightroom and Photoshop when we open the software for the first time. With Lightroom, everything seems relatively easy to understand. With a bit of exploration, we can soon get familiar with the software.
On the other hand, when we open Photoshop for the first time, we feel like we are in the middle of nowhere. All we see are unfamiliar tools, tabs and windows. Now most of us would have asked ourselves “When I have Lightroom why would I ever need Photoshop?”
The answer is, almost everything that is in Lightroom is available in Photoshop. But Lightroom cannot even do 10% of what Photoshop is capable of. The difference between Lightroom and Photoshop is similar to the difference between riding a bike vs driving a race car. It is vast. However, most photographer’s won’t care for the features that are not relevant to them, such as inserting 3D graphics, editing videos or running specialized filters.
Lightroom is pretty simple and has most of the functionality that is relevant to photographers. It has built-in functionality for image editing, but it is also a pretty powerful photo organizing tool, which Photoshop is not.
Also, Lightroom is “non-destructive” by nature, which means that all the changes you make to images do not get written on the image itself, but rather into the Lightroom database. Whether you shoot in RAW or JPEG, the original image is always intact. In contrast, whenever you open an image in Photoshop, it has already been demosaiced and flattened, so if you make a change to it and save the document, it will either overwrite the original image (in case of JPEG), or create a new file.
The bottom-line is, if you are going to make simple edits like adding or removing a few stops of light, adding contrast or saturation, sharpening or basic blurring, Lightroom does the job. If you want to take your editing skills to a new level and gain access to a whole suite of superb tools, then you have to get into Photoshop.
If you subscribe to Adobe’s Creative Cloud Photography plan, you get both Photoshop and Lightroom. They are meant to coexist in harmony, so that you can jump between the two when needed. For example, if you make some basic edits in Lightroom, then open it in Photoshop through Lightroom, you will see all the changes you made in Lightroom within Photoshop. Once you save your changes in Photoshop, it will automatically import the adjusted image into Lightroom.
To find out more about the differences between the two, check out our Lightroom vs Photoshop article.
Opening an Image in Photoshop
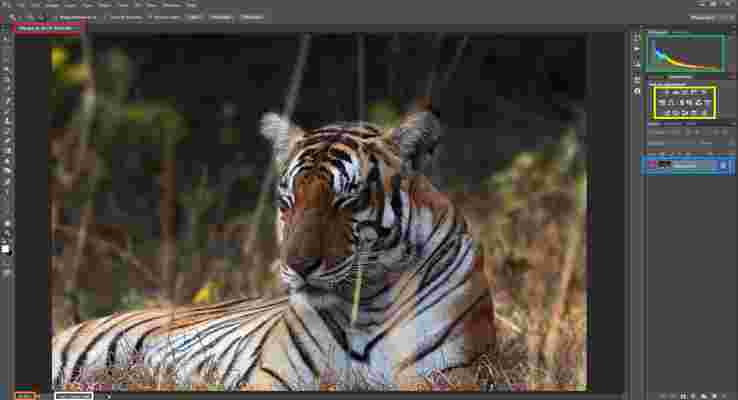
As mentioned above, you can either open an image from Lightroom with all the tweaks that you made visible in Photoshop, or you can open an image directly in Photoshop. As I have mentioned earlier, there is more than one way to do a single task in Photoshop. I am going to explain only the one which is the simplest one I personally use. The most widely used way of opening an image in Photoshop is just dragging the image from into the Photoshop window, as shown below:
Once you open a picture in Photoshop, you see a tab on the upper left (marked in red) with the name of the image. You can also open multiple image documents which will be opened as tabs. On the bottom left, you see the crop percentage (marked in orange). You can zoom in (by pressing Control/Command and +) or zoom out (by pressing the Control/Command and -) to either see the entire picture, or to pixel peep at 100% crop ratio.
Pressing Control/Command + 0 fits the image to the workspace while pressing Control/Command + 1 gets it to 100% crop. While using Ps try to memorize the keyboard shortcuts as they help make things easier and faster.
Next to it is the file size display (marked white). Depending on the type of file you are working with, the size of the file increases substantially. For example, the size of a 24MP full frame RAW file would approximately be 30 MB. The same file can go up to 1 GB if you add a dozen layers added to it. We will get to layers in just a bit.
When you convert it into a JPEG of the same resolution, you might end up with a 8-12 MB file. For every layer you add to a Photoshop document, the size of the file increases in multiples of the size of the base layer.
On the right upper corner, you see an RGB Histogram (marked with green). Right below it, is the Adjustment toolbox (marked yellow). Below it, marked with blue, is your current layer selected inside the Layers tab. On the left you can see an eye icon (marked purple) which can be toggled. Once you click, the eye symbol appears, which means the corresponding layer is visible.
When you click it again, the eye symbol disappears which means the corresponding layer becomes invisible. On the other end, marked with indigo is a lock symbol meaning the layer is locked. It means, certain tweaks cannot be applied directly to the layer.
Opening a RAW file
The above holds true if we are opening a .psd, .jpg or any other image format that Photoshop can read. But that is not what we often want to open in Photoshop. Most of us shoot RAW and once we decide an image has to be edited to some extent, we have to shoot RAW. When we try to open a RAW file in Photoshop, instead of just opening the file directly as it does with a TIFF or a JPEG, Photoshop does something extra.
Once you drag a RAW file into Photoshop, you see a new window with the title “Camera Raw”. This is Adobe’s specialized tool for reading and editing RAW files. If you are already familiar with Lightroom, ACR’s (Adobe Camera Raw) layout will not look alien.
ACR gives you some basic functionality that is pretty similar to what you find in Lightroom. But do note that, if you have the latest camera but you do not have the ACR update that includes that camera model, you will not be able to open the RAW files from that camera.
In such cases, you have two options. The first option is to use Adobe’s RAW to DNG converter, which is available for free. Once you convert images to DNG format, you will be able to open them even in older versions of Adobe Camera RAW.
If Adobe has not yet provided support for your camera, you will need to resort to the second option, which is to use the proprietary software that came with your camera in order to convert the RAW file to something Photoshop can read, such as TIFF.
Also note that while editing an image, you will need maximum possible data to work with. That is one of the primary reasons why we shoot in RAW, isn’t it? If you convert it to a JPEG, you are left with 8-bits of data to work with. But if you choose TIFF or preferably a format like DNG, you can work with all the original data without losing anything.
For the above opened image, I made some basic tweaks in ACR. In addition to adding a bit of exposure, contrast and saturation, there is another important fix that is advised to be made in ACR, Lens Correction.
ACR provides built-in profiles for correcting lens specific issues like distortion, chromatic aberration and vignetting. Again, a corresponding ACR profile has to be available for that particular lens. Outdated ACRs cannot do this and you have to try making adjustments manually. Once you find your lens profile in ACR, select the camera model & the lens, and ACR will apply that particular profile to your image.
Once done, click on “Open image” and the RAW file will be opened in Photoshop with the adjustments in ACR applied to it.
Saving & File Format Recommendations
Once you are done with your editing, as with most other software, to save a file for the first time, or as a new copy, go to File -> Save As. This lets you choose the type of file which you want your work to be saved as.
I would recommend one of the two file types: Photoshop (*.PSD, *.PDD) or TIFF (*.TIF, *.TIFF). Photoshop PSD files can only be opened in Photoshop, whereas TIFF is a format that most image viewing and editing software recognize.
Certainly they will lead to considerable increase in file size, but both formats hold maximum possible data. I personally prefer TIFF as I use Nikon’s Capture NX-D instead of ACR. I export RAW files as 16-bit full resolution TIFF in NX-D and open that TIFF file in Photoshop. If you are not going to print and you are planning to use the image primarily for the web, 8-bit TIFF should be sufficient.
Generally, you will be saving two copies of every image. One as a PSD or as TIFF that has all the data, and one more as JPEG for web use. If you are using a version of Photoshop above CC 2015, you can save as JPEG using File -> Export -> Save for Web (legacy). A new window pops up. Make sure the image format selected is JPEG (marked red).
Next, you can choose the image quality (marked green), from Low to Maximum, depending on how much data you want to preserve in the resulting JPEG image. Basically, the higher the image quality, the larger the file size due to different lossy compression levels. You can see the corresponding file size on the bottom left corner (marked purple).
Once you choose the quality, make sure “Convert to sRGB” is checked. Then you can type in the desired resolution (marked yellow). Generally, a resolution of 2048 on the longer side of the image is sufficient. Make sure the link icon is checked, as it automatically adjusts the other side of the image corresponding to the set aspect ratio. Then click on “Save…” to save a JPEG copy of the edited image.
In addition to PSD, TIFF and JPEG, there is another format that is worth knowing, namely PNG. The primary difference between PNG and JPEG is the ability to preserve transparency. PNG can do that, but JPEG cannot. For example, if you are planning to make a transparent logo that can be inserted on top of other images, it is best to save it in PNG format rather than JPEG.
Always remember that whenever you see an image or a layer that is checkered, it means it is transparent.
If you opened an image from Lightroom by right-clicking and choosing “Edit in Photoshop”, then instead of choosing the “Save as” option, just save the file normally. Once you do that, you will see that the image will be automatically imported into Lightroom from Photoshop.
Photoshop Toolbox
When you open Photoshop, after you bypass the last opened file list, the illustration screen below is what you will see. Before we proceed to anything else, let us set up your work space. The applications of Photoshop goes beyond editing pictures. So the first step is to tell Photoshop that we are going to use it to edit pictures.
Go to the menu Window -> Workspace -> Photography. This will display a workspace with the tools specific to photography.
Now you will see the toolbar on the left (marked with red).
The majority of the tools that you see on the toolbar contain a number of different tools. It generally is denoted by a small arrow at the bottom right corner. This simply means that the tool has a group of tools that pop-up when you right-click it (marked orange) which perform different operations.
When you select a tool from the toolbar, the properties or available options for the corresponding tool get displayed on the top, just below the menu bar (marked yellow).
For example, in the illustration above, we have selected the “brush” tool. So the properties of the brush tool like brush size, blend mode, opacity and other properties related to the brush tool are displayed above. Remember, the tools and pallets can be re-arranged to suit your requirement. Let’s take a look at four of the most frequently used tools.
Crop Tool
Cropping an image is typically one of the first steps of post-processing. You can bring in the crop rulers by clicking on the crop tool (marked green in the picture below) in the tool palette. You can then resize by dragging the eight corner placeholders. You can also rotate the image by dragging any of the four extreme corners. When you move the mouse exactly to the extreme corner (top left, top right, bottom left & bottom right), the mouse pointer turns into the resize symbol. When you move it a bit out of the image nearer to the corners, the rotate mouse icon appears and you can tilt the image clockwise or anti-clockwise.
While cropping, you can change its aspect ratio. It is the ratio between the length and the height of an image. By default, Photoshop tends to retain the original ratio of the image. You can change the aspect ratio by selecting one of the ratios from the drop down (marked red). You can also change it by directly entering the length and the breadth in the columns next to the drop down menu (marked orange). If you don’t want to stick to any pre-defined ratio, you can click on the clear button and Ps will allow you to get a custom ratio.
The next option to choose while cropping is the Overlay (marked yellow). Most of us are familiar with rules like the rule of thirds or the golden ratio. There are other complex overlays as well. You can choose one of the overlay and with overlays like the Golden spiral you can change the orientation by pressing ‘O’ to rotate the orientation. Once done, click on the checkbox and Photoshop will discard all pixels outside the crop.
Spot Healing Tool
There are times where we have dust settled on our camera sensors. If it lands in a spot where there are details, it generally does not show up much. But when it lands on a detail-less spot like the sky or a bright background, it shows up as a dark spot. There are other times where we want to remove distracting objects from the frame. The spot healing brush comes to aid to handle such problems.
In the image above, the red warning flag is a major distraction and it can’t and shouldn’t be physically removed. This is where the spot healing brush does the job almost effortlessly.
To use it, click on the spot removal tool (marked red). Then in the properties, make sure Content Aware (marked yellow) is selected. This works for almost 90% of cases. By right clicking anywhere on the image or by clicking on the size drop down (marked purple), you get the size/hardness properties pallet (marked orange).
Select the size (diameter in pixels) of the brush you want to use. Then increase or decrease the hardness of the brush. A hard brush will have sharp corners whereas a soft brush has smoothed out corners as shown in the image. Now once the necessary options are selected, drag the mouse over the patch that you want to remove.
Now you have your image without a trace of the flag in it. In this example, since the background is even, I have selected a hard brush. If it is an uneven patch, then a soft brush works best.
Each photograph is unique and it dictates the hardness or the softness of the brush. A soft brush is likely to leave blurry corners when it touches a detailed part of the image. So make sure to adjust the brush size and the hardness that suits that particular part of the image.
Clone Stamp Tool
This is an advanced version of the spot healing tool. The spot healing tool automatically heals the odd pixels by scanning the surrounding pixels. It works great when we have an even backdrop. But the Spot heal tool might not work all the time when we have distracting objects against complex backgrounds.
Instead of taking the reference context automatically, the clone tool lets us sample the source and replaces the target. By clicking on a source Spot while pressing the Alt / Option key lets you select a sample. Then all you have to do is paint it over the target. What Photoshop does is, it replaces the target pixels with the sample pixels. Most of the time a soft brush works for the clone stamp tool.
Most of the options in the properties window in the clone tool are similar to the spot healing tool. There is an extra option that we can choose called Sample (marked orange). You can tell Photoshop which layer to consider while taking samples . The default is the current layer.
In the example above you can see that the tool copies the sample from the source and replaces the target with it. To choose a sample, click on the area that you want to sample while holding the Alt / Option key. As you move and paint the target, you can see that the sample moves parallel to the movement of the brush over the target. So usually taking multiple samples to get a seamless clone stamp works.
Brush Tool
The brush tool is one of the most useful tools in the tool palette. In a nutshell, the brush tool does exactly what a brush is supposed to do in the real world.
Select the brush tool (marked red in the image below), then select a foreground color (marked green) and then choose the brush size as we did with the Spot healing tool and choose the opacity. Opacity is the equivalent of hardness in the spot healing tool. The difference being, opacity signifies the strength of the brush. It simply paints the foreground color, for that particular opacity on your image.
Now why would anyone want to paint a solid color on a photograph? The application of brush tool goes beyond painting a solid color on a picture. We will revisit in a bit when we go through layer masks as that is where it gets all more useful for editing photographs.
Dodge and Burn Tool
Dodging and burning is something most of us want to do for most of our images. What exactly is dodge and burn? To put it simply, dodge brightens whereas burn darkens.
In addition to dodge and burn, there is another sub-menu, sponge. The sponge tool, instead of brightening or darkening the pixels, changes the saturation. Once you select any of Dodge / burn / sponge tools, in the properties, you can select the range where you can specify which areas of your image will get affected (Highlights / Mid-tones / Shadows). The rest (brush size & opacity) is similar to what we did with the brush tool.
Next, all we need to do is, just brush it over the areas where we want to dodge/burn. For example, if we select the burn tool and select Highlights in the Range, it will burn only the highlights in the areas that is brushed upon. The mid-tones and the shadows will be left untouched.
Similarly, if we use the dodge tool and select Shadows from the Range, only the shadows will be brightened. The mid-tones and highlights will be unaffected. When sponge tool is selected, instead of the range drop-down we get the Saturate / Desaturate option.
Global vs Local Adjustments
Let us say we need to increase the brightness of an image. Out of the many ways to do it is to go to the menu Image -> Adjustments -> Brightness / Contrast. You get a window with two sliders where you can increase or decrease the brightness or the contrast.
When you increase the brightness using this method, you can see that the brightness is applied to the entire image. This makes it a global adjustment. Compare this to dodging that we saw in the previous paragraph. Instead of dodging the entire image, we brush it over only selected areas of the image. Besides that, we applied it only to a specific range of the image namely Highlights, mid-tones or shadows. This approach of selectively applying an effect to a specific area of the is called local adjustment.
There is another criteria that we might want to use where local adjustments work better than global adjustments. Let us say there are areas of the image where we need a stronger opacity and some areas where we need it subdued. In such situations, local adjustments are the way to go. To put it short, trying to recover shadow details in an image is a local adjustment whereas trying to add exposure to an entirely under-exposed image is global adjustment.
Layers
Layers are one of the primary reasons why many people stick to Photoshop. Most of you have probably heard about them and tried to understand what the fuss is all about. Let us recollect what we did with all the editing above. We selected a tool and applied it directly on the image, be it global or local.
But what if we did something wrong and we want to undo it? Yes we do have the history tool to do that. But unfortunately, all the editing we did after a particular undo point is wiped off. Above that, the history tool works as a temporary buffer.
Once you close Photoshop, the history is erased unless you save it as an action. If it is a long workflow, it really becomes painful. In another scenario, what if I feel I have to increase or decrease the effect of a previous edit.
For example, let us say I have increased the overall exposure. I open the same file a few days later only to see that I have overdone it and want to pull it down a bit. This is where non-destructive editing options like layers come into play.
Let us see the difference between a destructive and a non-destructive approach to editing. Let us say I select the eraser tool and remove a part of the image. When I re-open the image after a few days there is no way I can get back those lost pixels provided I did not make multiple copies of the image. This is a destructive approach to editing. Everything we saw so far is in a way destructive editing.
Let’s say we open an image document, then increase the exposure, then add contrast and then saturate it. Instead of dumping all the edits on the image directly, how convenient would it be if I layer them all one-by-one on top of each other. So the original will be the base layer and all the edits that we do will be stacked on top of it and on top of each other. The base will remain untouched.
On top of it, let us say I add exposure. Then I add contrast which sits on top of both the original and the exposure. And finally, the saturation gets above all of it. Now at any point of time, I can remove the exposure alone. Still, we will have the original, which obviously will be untouched but with contrast and saturation applied onto it. Think of it as a facial make up. We can add any make up and the face will be shown with the effect. But the face remains the same. Whenever we do not want any ‘layer’ of make up, we just have to remove it.
What I have done above is, I have opened an image and you can see it as the background layer. I have made a copy of the layer and placed it above the layer. You can copy a layer by simply selecting the layer, right click on it and click on ‘Duplicate Layer’ or use the keyboard shortcut Control / Command + J.
You get a dialog asking you to choose a name for the new layer. You can also duplicate a layer from one image and place it on another image document by selecting it from the Destination. We already saw that we can open a number of images as tabs in Photoshop. All the currently opened tabs will be displayed in the Documents.
The layer that is displayed at the top always acts like the foreground. The layers displayed at the bottom are considered backgrounds. What does a foreground do to a background in photography? It hides a part or the entire background corresponding to its placement with respect to the background.
That is exactly what foregrounds do in layers. The layers are literally placed on top of each other, hiding the ones below. We can choose to have a part of the background layers that we will be covering in layer masks.
As we saw before, the eye-icon in front of a layer can be used to toggle between Show / Hide of the selected layer. When we select it, we make it visible. Now we have two layers. The background layer, which is the original and the layer called BrightenedLayer which sits on top of it. Now we select the BrightenedLayer and then go to the menu Image -> Adjustments -> Brightness / Contrast and pull the brightness slider to about +10.
Now you can see that the brightness has been applied to the BrightenedLayer alone, leaving the Background layer below untouched. If you turn off the eye icon, you can see the layer below, turn it on you can see the one with the added brightness.
Hopefully this gives you some basic information about layers and how they work. You will understand layers better when we proceed to Opacity and layer masks.
Opacity
Let us consider another example of overdoing something, since that’s a common thing to do for beginners. Take a look at the image below. I have deliberately pushed the brightness all the way to the maximum, overexposing it. Obviously it is overdone. Now, I either have to undo it or delete the layer. As I have mentioned before, there are multiple ways in which we can get a specific result with Photoshop.
Using the opacity slider, we can control the percentage by which the top layer is visible over the layers below it. By default, opacity stays at 100% for all layers. When we bring the opacity down to 40%, what Ps does is, it shows 40% of the top layer and shows 60% of the layers below it. The most beautiful aspect of it is, Photoshop does it so seamlessly, without making it look artificial.
So the bottom-line being, when we feel we have overdone anything, the simplest way is to drag down the Opacity slider until when we feel it is just about right. In addition to opacity, there is another option called Fill. For most cases, opacity and fill behave the same, except for situations when we use it with one of the Special blend modes.
Adjustment Layers
In the previous section, we saw how to apply an adjustment to a layer. But that method seemed to have a problem. We were able to use the opacity slider to reduce the effect of the edit. We also copied the layer and placed it on top of the original. The real problem comes when we had to go back and adjust the values in the slider again.
While working with adjustments in the previous method, we either have to delete it and redo it all over again should we make any changes or use the History tool. Let us say we increased the brightness by +25. Should we increase it more, we have to add another brightness layer. It makes the process sort of destructive again.
Instead, just imagine what if Photoshop does it all for us and we can re-edit the values whenever we want, without even touching the opacity slider. This is why Photoshop has the concept of Adjustment layers.
If you compare the menu options in the Image -> Adjustments menu (marked red) and the Add an adjustment (marked green), they do pretty much the same thing. There is one difference though.
Instead of choosing adjustments from the menu, when you click on the equivalent icon from the Add an adjustment palette, a new adjustment layer is added on top of your existing layer.
Click on the Brightness / Contrast icon (marked green). You can see a new layer (marked yellow). When we did the same using the menu, we had a dialog box and the brightness was applied directly on the selected layer.
The advantage with the adjustment layer is, even after you save and close the document, you can re-open it and when you double click on the layer icon (marked purple), you can see the value you set on the brightness slider and at any point of time you can change it. This makes it completely non-destructive.
There is a basic difference between any other layer and an adjustment layer. In our previous example, when we copied the base layer, and with 100% opacity we saw that the bottom layer was totally hidden. Contrary to that, an adjustment layer applies the specified adjustment onto the layers below.
Photography Life has comprehensive articles about Levels adjustment layer, the Curves Adjustment layers and an article about Saturation which are the most commonly used and some of the most powerful adjustments.
Layer Masks
We now have a basic understanding about layers. Layer masks make them even more powerful. So what is a layer mask? We already saw that we can control how the foreground comes on top of the background. There could be situations where we need a part of the foreground (top) layer and a part of the background (bottom) layer to be visible.
In other words, we might want a part of the foreground to be opaque and a part of it to be transparent. In the areas of the layer where it is transparent, the layers below are visible. Layer masks as the name suggest are used to ‘mask out’ certain areas of the selected layers.
There is one important aspect of layer masks that we need to have in mind. White shows, black hides & 50% grey is 50% opaque.
Let us take an example so that we can understand it better. In the illustrative image above, I have added an Exposure adjustment layer by clicking on the respective icon (marked red) and in the properties, I have increased the exposure by one stop. Take a look at the icon marked green. That is the layer mask icon.
By default, every adjustment layer comes linked with a layer mask in the recent versions of Photoshop. We already saw that an adjustment layer applies the adjustment onto the layers below it. It does so, as it applies the adjustment as a mask. You can add a layer mask to any layer by selecting the add new layer mask icon (marked yellow). Now the default is white. It means that the layer on top shows is fully visible, because we now know that white shows, whereas black hides. This also means that the exposure is applied entirely on top of the original image below.
Unfortunately, since the exposure was applied to the overall layer evenly, certain areas of the subject turned overexposed (marked blue). So we are going to mask out everything and paint the mask in white only at the areas where we need to increase the exposure. To do this, let us first select the layer mask and invert it by pressing Ctrl / Command+I. Now you can see the color of the layer mask turn black which means that the current layer has become transparent (because black hides). This, in turn, makes the below layers visible.
What we are going to do is select the brush (marked red), dial in the needed diameter, make it soft by bringing the hardness of the brush close to zero and paint over the dark areas on the image. There are two things we need to make sure of. First, we need to ensure the foreground is white (marked green). Second, we need to ensure the layer mask is selected and not the adjustment layer itself (marked blue).
Check out the layer mask linked to the Exposure layer. You can see that only the spots where we have painted white on the layer mask are visible, whereas in the areas that are left black, the exposure adjustment does not apply. You can toggle the mask view by clicking on the layer mask while pressing Alt / Option button.
Check out the area marked red. Instead of either going 100% white or 100% black, I have selected an opacity of 56% to control how much it shows. You can see it reflected as grey in the layer mask view.
NIKON D7000 @ 11mm, ISO 100, 1/8, f/8.0
Let us look at another case where layer masks might be very useful. With the picture above, we see that the sky is a tad too bright. Seamlessly darkening it a bit would make it look better.
We add a new Exposure adjustment layer named Exposure 1. Make sure that the layer mask of the exposure adjustment layer is selected. Then select the gradient map tool (marked green) and place the mouse in the middle of the image and drag it down (marked yellow).
You can see that there is a gradient from white on top to black at the bottom on the layer mask. This gives you a similar effect that a graduated neutral density filter would give you. There are multiple ways to selecting an area of the image like Blend-if and Luminosity masks. There are practically unlimited ways to use layer masks.
Blend Modes
In the previous sections, we understood what layers are and how powerful they are in Photoshop when combined with layer masks. In addition to that, we can also control how a layer blends with the layers below.
Take a look at the picture above. I added an Exposure adjustment tool, reduced it by a stop (-1) and masked out the right half of the image. So the exposure adjustment layer will be visible only on the left side. Then I created a copy of the Exposure adjustment layer which obviously has the same -1 setting. For this, I masked out the left half. Obviously, both sides should be the same. In the blend mode drop down of the ‘Exposure 1 copy’ layer, I changed the blend mode from “Normal”, which is the default blend mode to “Overlay” (marked red).
You can see that the difference is drastic. Even though the adjustment layer and the value we punched into it is the same, two different blend modes give us completely different results.
A blend mode dictates the way in which a layer shows over the layers below it. In the above example, the normal blend mode just reduces the exposure by a stop, whereas the overlay blend mode adds contrast.
Let’s use another example of the picture above. Similar to the previous one, I underexposed the left by a stop and blended it with “Normal”. I did the same with the right half, except I blended it with “Luminosity”. While the left half is underexposed, you can see that it reduced the saturation as well.
For the right half, since I selected the “Luminosity” blend mode, it affects only the exposure attribute, leaving the other attributes of the image like saturation untouched. Photoshop has segregated blend modes according to their types as shown in the illustrative picture below:
Understanding all the Blend modes requires a comprehensive article for itself, which I will write in the future.
Filters
What happens when we add a filter like a CPL or an ND filter on top of our lens? Filters in Photoshop work similarly. By default, when you go to the Filters menu, there are a handful of filters for sharpening, blurring, adding / removing noise, etc. In addition, there are tons of Plug-ins by third party vendors, most of which go into the filters menu. Remember that whatever filter you choose, it will get directly applied to the selected layer. Some menus might not work when an adjustment layer is selected. So make sure that you select the layer that you want to apply the filter to. As a general practice, it is wise to copy the layer that you want to apply the filter to.
Note that Adobe Camera Raw that we previously saw can be applied to a layer just like any other filter.
Smart Objects
Just like layers and masks, smart objects are some of the most used features of Photoshop. We saw that filters and other adjustments can be destructive when applied to a layer, and we often cannot tweak the settings again. Smart objects, on the other hand, provide a solution to that. When we convert a layer into a smart object, Photoshop applies all the adjustments / filters as smart filters, as shown in the picture below:
You can convert any layer into a smart object by first selecting the layer and then right-clicking on that layer and choosing the “Convert to Smart Object” option. Once you do that, the smart object icon appears on the layer (marked red).
In the above example, I made two adjustments. First, I used the Camera RAW filter. Next, I increased brightness using the Brightness / Contrast adjustment. You can see that both have been applied as smart filters on the same layer.
Now should I need to change the values of any of the smart filters, all I need to do is double click on the filter. Just like the adjustment layers, the corresponding dialog box opens up, in which the values I selected are already displayed. I can then tweak them as desired. In fact, I can also change the blend mode of that particular filter by double-clicking on the icon marked blue.
The applications of smart objects go way beyond what is mentioned above, which we will cover in future articles.
Conclusion
In this article, we covered all the basic functionality and tools related to post-processing photographs for beginners who want to explore Photoshop. The article was intended to only lay out the foundation, which is important to have for all the upcoming Photoshop articles that we are planning to publish at Photography Life.
If you have any questions, or if you believe that I missed out anything important, please let me know in the comments section below.
How to Use Photoshop: The Bookmarkable Photoshop Tutorial for Beginners
When you open Adobe Photoshop for the first time, it's easy to click around in confusion for a minute and then reach for your freelancer's phone number instead. Trust us, you're not alone in this.

It's an incredibly powerful design software with a lot going on, including a wealth of tools that can seem overwhelming at times. But Photoshop isn't just for the professionals.
With a little help, you can easily teach yourself how to use it to create beautiful, compelling graphics. All it takes is an introduction to core elements -- in plain English.
To get you started, we've picked 12 of the most useful tools in Photoshop and explained what they do, where to find them, how to use them, and a few tips and tricks for getting the most out of them. We've also included some great resources in there in case you'd like to learn about a tool in more depth.
What It Does: A layer can be used for an image, text, brush strokes, background colors, patterns, and filters.
I like to think of layers as sheets of glass stacked on top of one another that you'll use to create a final product. Each sheet can be modified individually without affecting the project as a whole, which can save you tons of time when making edits to individual elements of your graphic.
Image Credit: StackExchange
Layers are by far the most important element of Photoshop -- and, in my opinion, they're one of the reasons many people throw their arms up in frustration. But once you understand how they work, I promise they'll make your life much easier.
Where It's Located: It has its own module on the bottom right-hand corner of your Photoshop screen, by default. You can also access it by clicking "Layer" in the top menu bar.
Pro Tip: Always name your layers. Keeping them organized will help keep you sane, especially if you find yourself working on a project with a large number of layers.
From the top menu bar, choose Layer > New > Layer...
The selected layer is highlighted in blue. To edit a specific part of your image, you'll need to select that specific layer.
You'll also notice there's an "eye" symbol next to each layer: Click that symbol to turn the eye on and off, thereby toggling the visibility of that layer as you work.
First, select a layer or group in the Layers panel. Next, either drag the layer or group to the Create a New Layer button, or right-click the layer to choose "Duplicate Layer" or "Duplicate Group." Enter a name for the layer or group, and click OK.
Pro Tip: You can do all sorts of cool things with layers -- and believe it or not, making animated GIFs is one of them. Check out our step-by-step tutorial here.
To learn more about adding, deleting, and duplicating layers in Photoshop, check out this video tutorial.
2. The Color & Swatches Tool
What It Does: The Color and Swatches tool lets you use, modify, copy, and save custom colors for your content. While this may seem like a pretty self-explanatory element, it actually has powerful features that will keep your visual content vibrant and unify your color schemes.
Where It's Located: It has its own module on the top right-hand corner of your Photoshop screen, by default.
Another place to find the Color tool is at the bottom of the toolbar on the left, indicated by two overlapping boxes:
To create your own custom color:
Open the Color Picker by double-clicking on the top box either in the Color module, or in that menu on the left.
From there, you'll see a vertical spectrum of color with a slider on it, which you can adjust to create your own custom color. Alternatively, if you already have a specific color of which you know the hex value #1fb1ee), then enter it in the appropriate box to find that color automatically. You can also select your color swatch based on RGB or CMYK values.
Any colors you create can be added to your "Swatches" if you click "Add To Swatches."
Pro Tip: Take your company colors and save them as “Swatches” so that you can reference and reuse them whenever you’re designing your visual content.
3. Custom Fonts & The Text Tool
What It Does: The Text tool lets you add custom fonts to your database, and it gives you access to advanced font settings that give your text some serious style.
Where It's Located: The toolbar on your left, near the bottom.
Once you click the Text tool icon, all of the settings and font options will pop up at the top of your screen. These settings let you change the font, font size, and spacing between characters, height, width, color, and style. Be sure to select the layer of your desired text to edit it.
To add text to your graphic:
The text tool works like any other text tool you’ve used. Click the "T" icon on the left side bar, drag the text box over any particular area you want text to appear, and you’re set to go.
Whenever you create a text box, Photoshop will generate a layer for it. You can choose the color, size, stroke, font style, and a variety of other options to switch things up.
Pro Tip: While Photoshop offers a wide variety of fonts, you can also install your own fonts. Read this blog post for a list of 35 beautiful fonts you can download for free, and then read this post to learn how to install your new fonts in Photoshop so you can get to using 'em.
To learn more about fonts and the Text tool, check out this video tutorial.
4. Custom Brushes & The Brush Tool
What It Does: Just as with fonts, you can add your own, royalty-free, custom brush tips. With the brush settings, you can change the size, shape, and transparency of your brush strokes to achieve a number of different visual effects.
Brushes are a great way to add some visual accents to your content. Photoshop starts you off with a nice selection of brush tips that you can use to clean up your graphics and create some basic visual effects.
Where It's Located: The toolbar on the left.
Once you click the Brush tool icon, all of the settings and brush options will pop up at the top of your screen. These settings let you change the brush size, opacity, flow, and so on. You'll find a variety of pre-installed brush tips, as well as any custom brush tips you install to Photoshop. (You can find royalty-free brushes at if you want to get really creative.)
To use the brush tool:
The brush tool is perfect for adding design accents to your content content. When using the brush tool, I always suggest adding a new layer to work with so you don’t paint over any of your other elements. You can choose colors from your library of swatches, or use a custom color.
Changing the brush settings can give your brush a drastically different look and style. Don’t be afraid to play around a bit with all of your custom brushes.
5. The Select Tool
What It Is: When used correctly, this tool will let you select individual elements, entire graphics, and determines what is copied, cut, and pasted into your graphics.
Where It's Located: The toolbar on the left.
The Select tool is known as one of the most basic, yet frustrating tools to use in Photoshop. The first thing you should know is that it'll only work if a layer is highlighted. So, if I want to cut or copy a piece of Layer 4, Layer 4 must be highlighted in my Layer's tool bar. Highlighted areas are indicated by a flashing dotted line.
Once you remember to pay attention to which layer you are working with, the Select tool becomes much easier to use.
First, highlight your area of choice. Then, simply right-click and decide what you'd like to do from the pull-out menu. For example, you can cut out objects from a current layer and create a layer of your own.
How to select an image to insert into your graphic:
Open the image you'd like to use in Photoshop, and use the Select Tool to determine how much of the image you want to copy. Once you’ve selected the area of the image, simply copy the area.
Next, open the tab for your current project and paste it in as a new layer. Highlight the layer of the object(s) you'd like to select. You can move multiple objects at once by highlighting multiple layers.
Then, right-click your selection, and then you have a few options, including:
A) Choosing "Layer via Copy" to copy the object(s) from this layer and create a layer of its own.
Pro Tip: To select your entire graphic and include all layers, highlight all layers and then use the Select tool. Once you've determined the area to copy, use the menu bar at the top and click "Edit" > "Copy Merged." This will copy the entire graphic so you can paste it as its own layer.
B) Choosing "Free Transform" to scale, rotate, move, and flip your selections. (Refer to the Move tool in the next section of this post if you need more help on this.)
Pro Tip: One really nifty trick you can do with "Free Transform" is to overlay screenshots of a PDF to make a 3D-looking image, like the one below for our introductory Pinterest ebook. You can find a visual overview of the steps below, but read this blog post for the step-by-step tutorial.
To learn more about all the Selection tools available in Photoshop, check out this video tutorial.
6. The Move Tool
What It Does: This is a fairly basic tool that allows you to move individual elements of your graphic.
The Move tool works on individual layers, and on the graphic as a whole -- if (remember how to do this?) you highlight all of your layers. It comes in handy when you’re trying to reposition images, text, and other design elements.
Where It's Located: The toolbar on the left, at the top.
To use the Move tool:
Click the Move Icon from the left hand menu bar and simply drag the object(s) you would like to move. To move all objects in one layer, simply highlight the layer and use the Move tool. You can also right click the object for additional options.
To scale, rotate, move, and flip things:
The Free Transform tool lets you scale, rotate, move, and flip any element in your select layer or layers. Use the shortcut CTRL + T or Command + T (for Macs) to initiate Free Transform, and check out the options that pop up at the top of your screen. Hold the SHIFT key while transforming to maintain the proportions of your elements.
7. The Zoom Tool
What It Does: The Zoom tool lets you zoom in close to certain areas of an image, and zoom out to get more of a bird's eye view of what's happening.
Where It's Located: In the top menu bar, choose View > Zoom In or View > Zoom Out.
To use the Zoom tool:
Either select the zoom options from the "View" menu (as shown above). To use the keyboard shortcut, hold ALT (PC) or Command (Mac) and press + to zoom in, and ALT (PC) or Command (Mac) and press - to zoom out.
8. The Eraser
What It Does: The Basic Eraser functions a lot like the brush tool. You can change the size and hardness of the eraser tip to achieve a variety of effects, like blending and fades. The Background Eraser uses differences in color to help you erase unwanted background areas from your images.
The eraser is one of the most useful tools in Photoshop. Yes, I understand it’s technically just an eraser, but you’ve never used an eraser like this.
Where It's Located: The toolbar on the left.
To use the Basic Eraser:
Once you click the Eraser icon, all of the settings will pop up at the top of your screen. These settings let you change the eraser size, hardness, and other aspects of the tool.
Like most tools in Photoshop, the eraser works only on a specifically selected layer. Make sure you've got the layer you want selected before you start erasing.
To use the Background Eraser:
This tool is a time-saving wonder. You can see how easily it eliminates background colors from images. This is especially helpful if you need an object with a transparent background.
To use the Background Eraser, click and hold the eraser icon until the slide out menu appears. Choose "Background Eraser."
Now you're ready to do some serious erasing. Adjust the size of the Background Eraser, and simply click the color you would like deleted from the selected layer. Remember to select the layer you want to erase on.
Pro Tip: Don’t be afraid to use an oversized eraser tip for the Background Eraser. Since it works by removing particular colors from the image, it won’t erase colors that aren’t selected.
To learn more about how to remove the background of a photo in Photoshop or PowerPoint, check out this step-by-step tutorial.
9. The Crop Tool
What It Does: The Crop tool lets you crop an image. It works like any crop tool you’ve ever encountered: Simply choose your area and crop it out.
I know this is a basic tool, but you’ll find yourself using this just as often as any other tool in Photoshop, especially when you’ve completed your graphic and need to clean up some of the free space around the edges.
Where It's Located: The toolbar on the left.
To use the Crop tool:
Select the icon indicated in the screenshot from the side menu bar, and drag the box over the area you would like to crop. To adjust the crop box, simply click and drag the small anchor boxes on the sides and corners of the crop box.
Pro Tip: You can make your canvas size larger than it needs to be so that you can give yourself more room to move your design elements, and crop it down to the proper size afterwards.
Read this blog post to learn how to crop images in Photoshop to a specific ratio. If you want to learn some cropping tricks -- like how to rotate an image using the Crop tool -- then check out this article from Digital Photography School.
10. The Fill Tool
What It Does: The Fill tool, formerly the Paint Bucket tool, fills any solid area with the color of your choice. It's great for solid backgrounds or coloring large areas. It can also be used to apply patterns to your images. The Gradient tool within the Fill tool lets you create a nice, faded background effect of the color of your choice.
Where It's Located: On the top menu bar, choose Layer > New Fill Layer. From there, you have the option to choose "Solid Color," "Gradient," or "Pattern."
To fill a solid area with a color:
First, select the layer you'd like to fill with a solid color. Then, from the top menu bar, choose Layer > New Fill Layer > Solid Color... From there, a "New Layer" window will pop up and prompt you to name the new color fill layer. Don't worry about choosing the color you want right then and there -- simply name the layer and press "OK."
Next, the Color Picker window will pop up. Here, you can choose which solid color you'd like to fill. Since I'd selected my background layer to fill in the color of the sky in my graphic), the color I select in the Color Picker dictates the color of the sky:
To apply patterns to your images:
These patterns can be manually created if you have the time and patience, or you can find a variety of royalty-free patterns available for download through a basic Google search.
To apply a pattern, first select the layer you'd like to fill with a pattern. Then, from the top menu bar, choose Layer > New Fill Layer > Pattern... From there, a "New Layer" window will pop up and prompt you to name the new color fill layer. Don't worry about choosing the color you want right then and there -- simply name the layer and press "OK."
Next, you'll see the "Pattern Fill" window pop up. From there, you can choose the pattern and its scale. Since I'd selected my background layer to fill in the color of the sky in my graphic), the pattern I select in the Pattern Fill changes the sky:
To use the Gradient tool:
To apply a gradient, first select the layer you'd like to fill with a pattern. Then, from the top menu bar, choose Layer > New Fill Layer > Gradient... From there, a "New Layer" window will pop up and prompt you to name the new color fill layer. Don't worry about choosing the color you want right then and there -- simply name the layer and press "OK."
Next, a "Gradient Fill" window will pop up. Play around with these options, including the style, angle, and scale. To choose a different gradient than the one offered by default, click the arrow on the right-hand side of the default gradient to open the Gradient Editor, shown below:
11. The Eyedropper
What It Does: This handy little tool lets you extract and use any color from any image in Photoshop.
Where It's Located: The toolbar on the left.
To use the Eyedropper tool:
Select the icon from the sidebar. Next, locate that color you would like to extract, and simply click that area to clone the color.
Once you've extracted the color, you'll see it indicated both in the Color module at the top right of your screen, as well as the bottom of the left sidebar. You can double-click that color box to bring up the advanced color picker, where you can then adjust and save the color to a swatch for future use.
12. Blending Options
What It Does: Blending options include quite a number of features to enhance the look or your graphic. For example, you can use the "Outer Glow" effect to make letters appear like they're glowing. Or you can use the "Drop Shadow" effect to add a shadow to your letters. Take some time to play around with all the layer effects and find out which ones tickle your fancy.
Where It's Located: From the top menu bar, choose Layer > Layer Style > Blending Options... You can also double-click any layer to bring up the options for that particular layer.
To use Blending Options:
First, select the layer you want to apply your blending options and effects to. Then, open up your blending options and choose the one you'd like to apply. With the variety of options available, you can achieve a number of great effects to finalize your graphics. Have fun with these and experiment on different layers, images, and texts. Here's a look at what's offered:
For example, in the image below, I selected my text layer and chose "Bevel & Emboss." Looks pretty cool, eh?
Before we send you on your way, it's worth noting that if you're working with a limited budget and a tight schedule, you can save yourself tons of time and money by using free, royalty-free stock photos. Here's a list of 17 of the best free stock photo sites you can look through.
Also, Photoshop offers a number of really helpful keyboard shortcuts for things like zooming in and out, changing canvas size, creating a new layer, and so on. Check out this blog post for a full list, including shortcuts for some of the tools mentioned above.
Now, it wouldn't be realistic to guarantee that you'd be a Photoshop wiz at this point -- but that isn’t what this guide designed to do. We hope we've provided you with the understanding you’ll need to use the powerful tools in Photoshop in a timely, efficient, non-hair-pulling manner, so that you can elevate your visual content game, like, today.
Happy Photoshopping!
Photoshop for Beginners
Overview
New to Photoshop or need a refresher? This online course is designed to give you a solid foundation in the basics of Adobe Photoshop.
In 58 engaging lessons you will learn how to use basic techniques like layer masks and clipping masks, remove backgrounds, create custom shapes and a variety of effects, plus more.
Whether you use Photoshop for work, study, or leisure, these tutorials will start you on your journey to becoming a Photoshop pro!
Video tutorials are recorded in Adobe Photoshop CS5 and CS6.
If you've used Photoshop before, try our Advanced course. And if you'd like to know everything - from beginner to advanced lessons, why not take both?
Once enrolled, our friendly support team and tutors are here to help with any course related inquiries.


